Monday, October 18, 2010

Advanced baking: Sugar station

Sugar station was a lot of fun as well as being quite a bit painful at times. Most of the sugar has to be handled at uncomfortable heat levels until your skin starts to toughen up a bit. Even then during some parts of making the pulled sugar you have to handle it at burning temperatures with gloves and a thin nonstick mat between you and the burning hot sugar. The layers would protect us from the heat for about 5 seconds and then we would have to put our hands on the cold metal table to bleed the heat off our hands.


This was my first project. Various forms of pulled sugar used to make flowers, ribbons, leaves, and shells. After I had made a bit of each the assignment was to combine them into showpiece.


This was my second practical exam showpiece featuring blown sugar which I used to create the fish and dolphin. The green corral was created by pouring the molten sugar mixture into a pot full of ice. After giving the sugar time to set the whole thing is tipped out and the ice is allowed to melt while draining into a sink.


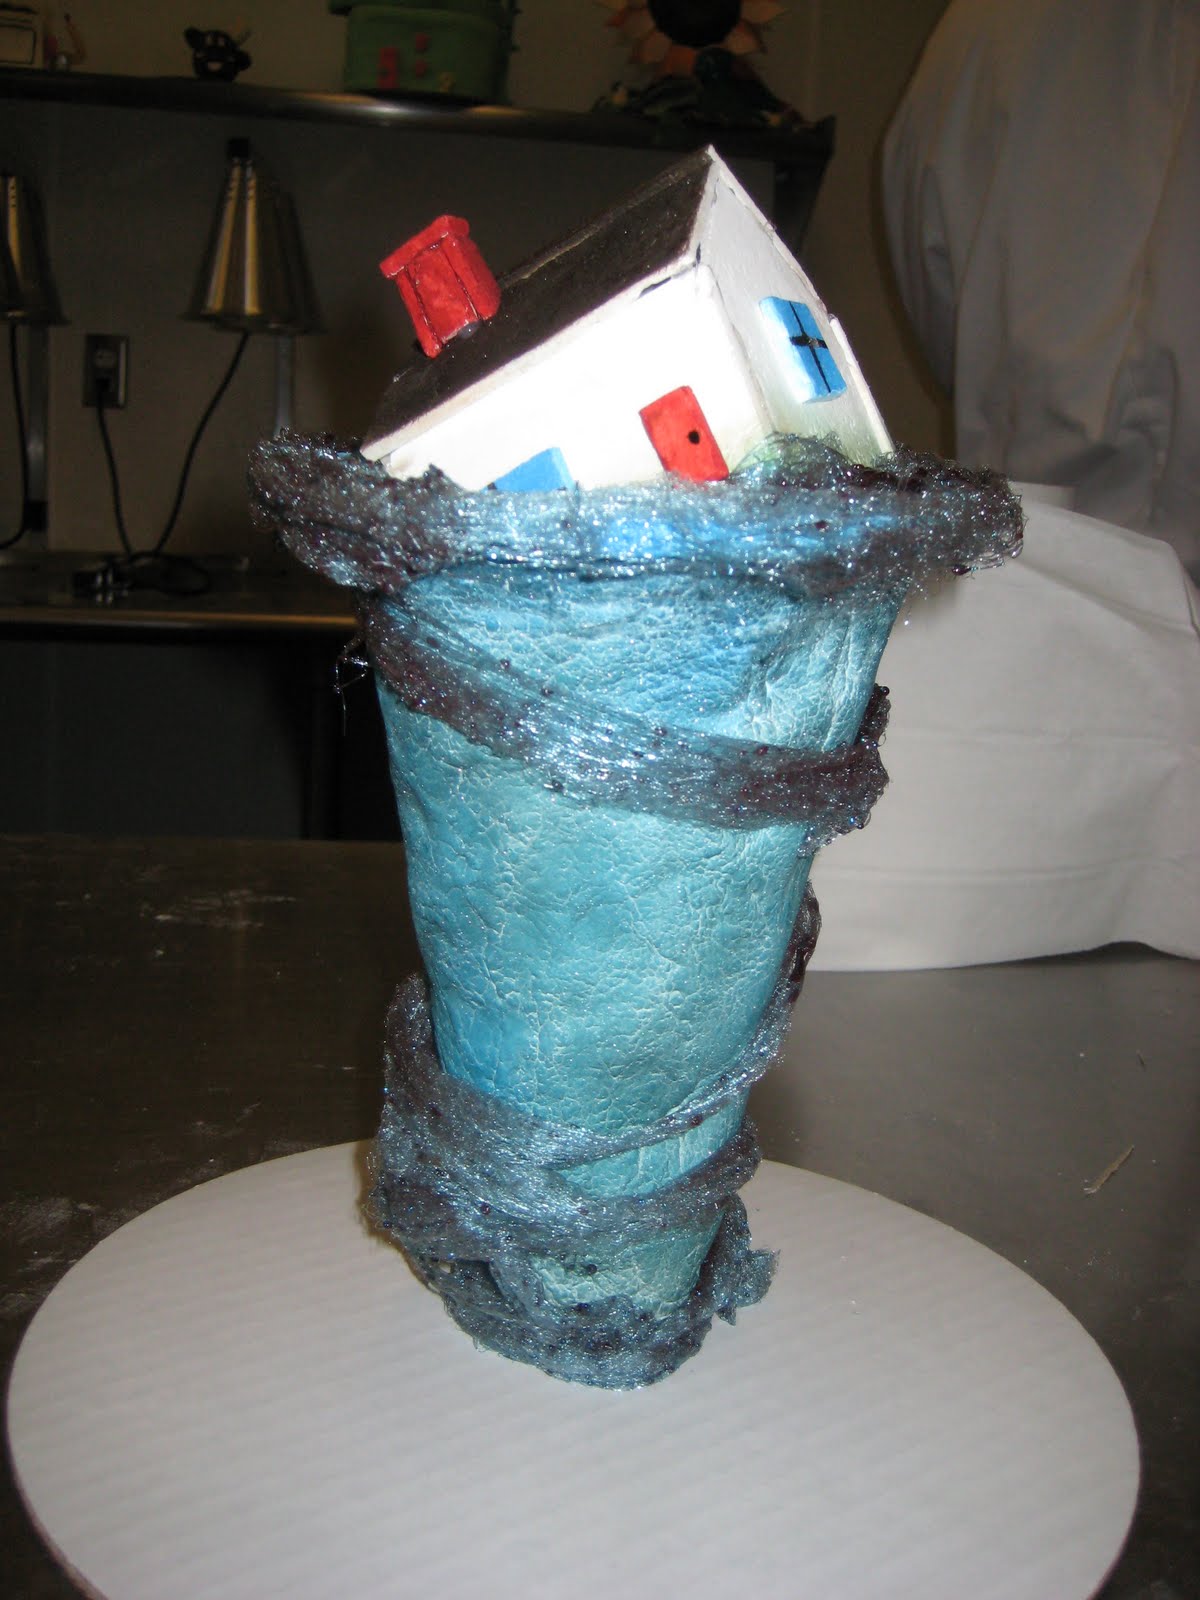
This is my final practical showpiece. This piece is based around the use of pastillage. Its kind of like clay but quick drying and very fragile when working with. Because of this pieces done in pastillage are usually 2 dimensional but I got and idea and was set on it. Even with the frailty of it I managed to pull it off and think I managed to make it look quite nice! It was required that one pulled sugar style element should be included. I opted for spun sugar because I thought it would work well for the piece and we hadn't had a chance to work with it yet in class and it was the last day. Turns out the reason why we don't work with it as a regular part of the curriculum is because it makes a heck of a mess. The way it works is after you create the sugar mixture you dip a whisk with the curved ends cut off and whip the ends back and forth over a large wooden dowel hanging off the end of a desk. The centrifugal force causes hair thin strands to string off the whisk and cool instantly as it drapes over the dowel. After you do that a few times you gather all the strands up, fold them over a few times without packing them too tightly and use them for your needs.

Ok, thats it for advanced baking! I started management class today. Mostly its bookwork and time in a classroom. There are a few field trips we will be going on and hopefully i will be able to take some pictures. If so, I will make sure to put them up here.

Sunday, October 10, 2010

Advanced baking: Cake station

I really enjoyed cake station. We made a lot of really tasty Desserts and I got to work with piping icing using various tips and creating various designs.

This is a tiramisu item we made for Du Jour. Personally I am not too partial to coffee desserts so its not my favorite but it was a good dish. I quite liked the ladyfingers with a bit of the butter-cream filling on it. Lightly sweet with a bit of flaky crunch.

This item was created after another student asked if we could try making marshmallow. It was a success and afterwards we had a bunch of cubes left over so chef came up with a great idea of a S'more martini. We got to try it chilled and I don't know if it was served in Du Jour that way but I think it lost its flavor. The whole point of a S'more is a hot, molten marshmallow. Without that warmth its more like rocky road than anything else.

Kind of out of order here but this is a pistachio butter-cream cake I made for a practical test. The little fans you see on the top are white chocolate colored with what is known as "chefs rubber" it is used exactly like food coloring but is fat based instead of water based because adding any water to chocolate will cause it to seize up and become unusable.

Another cake we made for Du Jour. This one Raspberry.

Yet another cake for Du jour! This time chef gave us control of the flavor(s) and we chose to go with a cappuccino flavored butter-cream and garnish with crushed butterfinger. The chocolate square garnishes were done by me in chocolate station earlier. its a process of laying down some white chocolate and scraping out curved lines with a comb-like instrument, letting it cool and harden and then layering dark chocolate on top, letting that cool and harden and then attempt to cut it into squares without shattering them in the process. Only about half survived the process.

This was a practice run before our wedding cake practical. This is actually done on some layered particle board to save the cakes for actual desserts or practical tests. Real cake is used on the practical tests so students can take it home and share it with their family. Since I am alone in a small apartment so I opt to trash it. This school already allow me to eat so well I really don't need a giant cake waiting for me at home. The white icing is the cheap type you would find at dept. store bakeries. Easy to work with and cheap but tastes incredibly sugary, you know the stuff. All it is is powdered sugar and shortening. not good stuff. Butter-cream is a much better tasting icing. A lightly sweet, delicate taste with a light texture as well.


My wedding cake! It took some time and effort but it was a lot of fun and I really liked how it turned out. I particularly liked the roses and found I did a decent job on them. I made so many that I used more than usual and still had about 3 left over. The wicker basket design on the side takes a lot of time and but looks great when its finished.


This is my fondant cake! We were given full creative control on this cake and I think I made pretty good use of it! Fondant is pretty interesting to work with. After giving it a taste it reminded me greatly of marshmallow but is rolled out and draped over the cake after a crumb coat is added to give the fondant something to stick to. The kokopelli on top was also made out of fondant that we made earlier in the week so it would get a chance to dry. the base coloring of the fondant was mixed into the fondant and the more vibrant colors were done with an airbrush loaded with food coloring. I am not sure how well it comes through but the theme I was kind of going for was the Montezuma Well cave dwellings, represented by the design on the middle tier, and the kokopelli, which represents fertility, followed by the Verde river on the bottom tier and Green shrubbery representing growth or spring.

It looked great, but after a few moves to various places for photos and to be displayed the kokopelli couldn't handle its own weight. he got shorter, while I tried to fix him I broke a little more off the bottom, he got shorter. I came back the next day with my parents for an open house event and while I was gone... he got shorter. I haven't looked recently but I think at this point he is just shoulders, a head and a flute...

Anyway, that was cake station! I have now also completed sugar station and have a bunch more photos to upload so I should have that posted within a few days.

Advanced baking: chocolate station

I have been having a lot of fun in advanced baking and I might have a bit of a knack for some of the things we have been doing.

First week I worked at chocolate station which was very interesting. We would spend a good part of our day writing with small piping bags of a room temperature mixture of chocolate and cream called ganache.


We would also pipe out "Happy Birthday" along with a border design onto plates for the restaurant in case they found out one of the tables was celebrating a birthday. If they actually made a note of the birthday when the reservation was placed we could get a name and personalize the plate like I did in the second picture.


We also practiced interesting little designs known as arabesques. When making them for actual use we would use tempered chocolate that is firm at room temperature so we can pop them off the parchment paper and use them to top cakes and various other desserts. Because of their fragile nature they would break if I wasn't very careful. Many expletives were used.


We also made after dinner chocolates with various fillings we got to experiments with. It was almost like science class as we mixed different liquids into the main mixture to see if we could come up with some tasty results. One mixture I and another student tried was rose water and almond. It tasted good in the bowl but when it was in the chocolate it tasted way too much like a chocolate filled with perfume. I did make another mixture that was just a banana flavored filling but it was a big hit and many were "sampled" by the other students and I. Near the end of the week I decided to experiment a little bit and make more of the banana filling and add crushed butterfinger. They rocked and disappeared quickly. Below is a photo of the filling before I filled it over with more dark chocolate and put it into the reach in refrigerator to set overnight.

Nowadays its all done by machines but its cool to know how to do it myself in case I ever want to make handmade ones to give out for holidays or something.

Besides the production items we also had two projects to work on. First was a chocolate oven that beyond the dimensions of the oven we had full creative control of how the oven looked. Since most ovens made had a stove top I decided to go with a grill top. It meant I had to make a bunch of tiny little black strips. It was tedious but I think it turned out well.


I scored a 49 out of 50 on my oven. I decided not to put anything in the oven because I wanted to concentrate on the scene happening on top which, if you are having trouble making it out, is a big fish being grilled while a cat is keeping a close eye on it from above. The fish, cat, grill, and knobs are made out of modeling chocolate. Its exactly like play-doh and you can modify the color with chefs rubber which is a fat based food coloring as water based food coloring causes the chocolate to seize up. Making the cat was especially difficult because it would absorb the heat from my hands and become too soft to hold the shapes I formed it into so I ended up making the cat in three separate parts and then assembling them on the oven so I could let each piece cool off while I worked with the others. I must have formed the head 5 times but each time I was almost done it got so soft that just holding it made it start to flatten out.

Second was a small amenity showpiece where we had complete creative control as long as it fit on a cardboard base and was able to display a few individual chocolates.


I was actually having some trouble coming up with an idea for this piece. The day when we were supposed to start the project I ended up thinking about my niece Shayla and how she liked cookie monster so after a little discussion with chef Meyer and a little research in the computer lab I had my idea and got to work. After making some blue modeling chocolate it was apparent it would take way too much if i were to craft it out of solid chocolate so I ended up using a Styrofoam cup as the base for the head and two 4oz plastic portion cups for the hands. It worked surprisingly well since in the show his hands are about the size of his head since both his head and hands are occupied by human hands. I was planning to make the five fingers but after working with the modeling chocolate the fingers would have never held up under their own weight so he got mittens instead. I actually managed to finish the piece that day despite being given a day and a half to work on it. As I am usually over critical of myself I wish I had done a little better job in a few spots but Chef Meyer really liked it. He gave me a score of 50 out of 50 points and had me put it on display in the schools front entrance!